 |
|
You are here: AOWiki>ARGOSPublic Web>ListOfHowTo>HowToExchangeLaserHeads (24 May 2016, WolfgangGaessler)Edit Attach
-- SebastianRabien - 15 Dec 2015
When to exchange a laser head?
A laser heads needs to be exchanged if it is broken. This is the case if a laser shows very low power, can't be tuned any more, or for preventative maintenance.What to do after exchange?
Broken lasers must be shipped to the manufacturer INNOLAS for service and repair!Where to find tools?
Go to 3U. In ARGOS cabinet 1? you should find a box with name: BOX #12, which should have the important tools included. An additional set of Allen keys (5, 4, 2.5) in metric are useful.- BOX #12
- Teflon slides
- Gloves
- Procedure mask (surgical mask)
- Hair protection
- screwdriver slotted (for beam expander set screw)
- Long metric Allen keys (5,4,2.5)
- Paper towels (for the spilling cooling pipes)
- Torch or even better some spotlight
- [Laptop] (for on site beam expander adjustment)
What to do:
- The laser head has to be exchanged and beam expander adjusted.
- Get Serial Number
- Get Laser Head number
- Get Maximum current from data sheet.
- The software parameter have to be set to the new head.
- Hardware parameters have to be set in software to start it up later. But first shutdown old!
- Update laser device wiki!
Ho to exchange the laser head mechanically:
- Shutdown laser system in software! Only on the corresponding side you have to change the laser necessary.
- Fetch the tools and the laser head, go up to the chamber, lock out the telescope and follow all the procedures to get to the laser platform.
- LSP Cabinet below Laser Platform:
- Turn the laser key switch to 0 for the corresponding laser controller unit.
- Switch the laser power supply mains on the right side of the supply off (black right switch). The white LED turns off.
-

- LLP cabinet at Laser Platform:
- Switch the corresponding laser interlock of the side (DX or SX) to 'L' position (= "Locked").

- Switch the corresponding laser interlock of the side (DX or SX) to 'L' position (= "Locked").
- Open the laser box to access the laser head. On the middle bar the Laser position is written.
-
- Unplug the power & control plugs. Unplug the water connections. Wipe spillage away if occurs.
- Loosen the beam expander set screw.
-
- Push the beam expander away from the head, until free. Let somebody hold the beam expander or fix with the supplied rope system/cable tie.
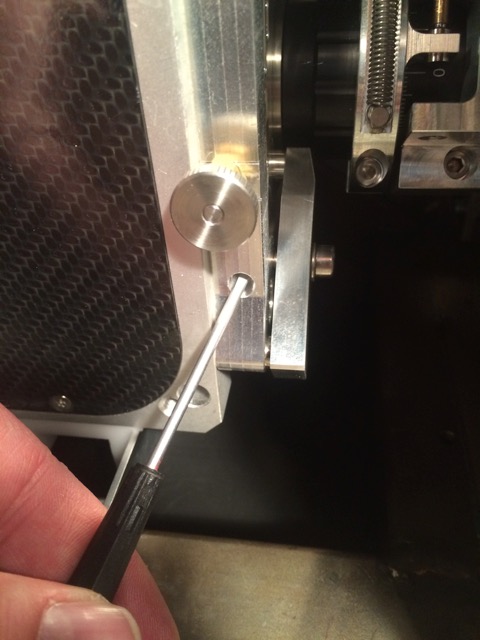
- Now unscrew the laser head (Box#12 special Allen 5). The screws can be accesed to the two holes on the top and bottom right side and the hole in the middle on the picture. Two screws in the front, one spring suspended in the back. For Laser 2 a long Allen 5 key is needed as the normal tools don't work!
-
- Put in the pads (not for Laser 2 possible) that allow to slide the head sideways out.
-
- Slide head out sideways. Keep in mind that there are two reference pins fixing the head position in place.
- Inspect the beam expander for any contamination on its lenses.
-
- Place the removed old head beside the new head, which to be put into the system.
-
- Remove the protective aluminum plate (Allen 2.5) covering the exit window of the new laser head.
- Unscrew the clamping pad (Allen 5) from the beam expander adjuster.
-
- Then remove the beam expander adjuster (Allen 4) from the old head and mount it onto the new head. Put also the clamp back.
- Screw the protective aluminum plate on the old laser's exit window.
- Remove the protective covers from the power and control connectors on the back of the new head and install them on the old head.
- For Laser 2 also change the handle!! (At this position, a special handle with cut off is required)
- If not yet done no is a good time to note the serial number and laser head number (picture it or write it but do it!!)
- Now slide the new head into position.
- Ensure that the beam expander is hold out of the way!
- Carefully find the pin locations, such that the head is positioned correctly.
- Fix the head in place with its three mounting screws. Check for the center screw (with a spring). If missing, use the one from the old head.
- Gently push the beam expander into its seat. Fix it with the set screw in place.
- Connect the Power, Control and Cooling plugs to the back of the unit.


- Switch the power supply on again.
- Turn the Laser Key switch to 1 in the LSP cabinet. The power supply and the cooler starts.
- Most likely it switches off again since the air in the heads cooling plate still needs to be pumped out.
- In such case turn again back to 0, and try again. This may occur several times until the laser stays in 'warming up'
- Turn the Laser Key switch to 1 in the LSP cabinet. The power supply and the cooler starts.
- Start up software with the new values for the head (What to do in software, second paragraph).
- Align the beam expander:
- Set the laser power to low current in software and turn laser on. (How to operate laser in enginering TBD).
- If no laptop at side this needs radio advise to the software operator.
- In that state one can view the beam exiting the beam expander.
- Adjust the X-Y aligner such that the beam exits centrally the lens.
- The laser should be visible on the pupil and field camera and should be adjusted close to the previous nominal position.
- Then fix the adjuster with the clamp.
- Set the laser power to low current in software and turn laser on. (How to operate laser in enginering TBD).
- The laser box can now be closed.
- The laser power can be increased.
What to do in software?
Before or after mounting new laser head (better even before but for sure before final beam expander alignment):- Laser controller must be in shutdown. Check in the controller GUI (argos_?x_las_controller_gui)
- Open LAS Maintenance GUI.(argos_?x_las_maintenance_gui)
- Select the corresponding Laser (position).
- Update with the information you have for the new laser head:
- The head number (label on the laser head top)
- The serial number (label on the laser head site)
- The maximum current for full power (from the lasers data sheet that comes with it!).
- Save and install.
- Restart laser service and laser controller in Monit (?X.LAS.LASER.BASDARD, ?X.LAS.CONTROLLER).
- Open laser controller GUI (argos_?x_las_controller_gui)).
- Power_up controller
- Set_up controller
- Start_up controller
- Open laser status GUI (argos_?x_las_status_gui) to monitor the pupil and field camera.
- Open laser lab GUI. (argos_?x_las_lab_gui)
- Select the laser (position) and set power manually:
- Check laser system state is "Shutter open"
- De-select full power
- Set power manually to 30
- Press Operational Mode button
- Increase the power slowly by confirming new values with enter.
- Check beam on the laser status GUI.
Software tasks when laser box is closed again to wrap up all.
- Adjust the new periscope nominal positions with closing the flexure loop. (Laser controller must be in "Ready_for_Observation").
- Press Close of flexure loop.
- The pupil and the field position must go to the defined positions on the camera.
- Put the new periscope parameters in the Maintenance GUI. Save and install.
- Adjust the pulse delay of the laser to fire synchronously with the others.
- Open the lab GUI of the side and go to the oscilloscope.
- Open pulse generator GUI on dx-lalas. (argos_las_master_pulse_generator_gui)
- Select the according laser.
- Adjust pulse delay until all lasers overlap again in the oscilloscope graph.
- Put the new delay parameter in the Maintenance GUI. Save and install.
- Adjust range in lab GUI (V/div)
- Put new range in config file (argos_trunk/site/lbt/?x-lalas/insroot/etc/argos_dx_agilent_osci.cfg)
- [Check collimation with the shear cam.]
- Adjust the fringe direction with the beam expander if required.
- Set new nominal position if beam expander has to be changed.
- [Check and adjust scaling of the online power measurement of the field camera.]
- Measure Power with the Check Power on controller.
- Compare with online values.
- Adjust online values if necessary in (TBD)
- Commit to SVN to preserve values!!
Final comment:
- A new head may require more recent a SHG tuning procedure. See HowToTuneLasersSHG
Edit | Attach | Print version | History: r8 < r7 < r6 < r5 | Backlinks | View wiki text | Edit wiki text | More topic actions
Topic revision: r8 - 24 May 2016, WolfgangGaessler
Ideas, requests, problems regarding AOWiki? Send feedback